Checking The Capacity Of Oxygen Absobers
How to Test the Capacity of an Oxygen Absorber
Generally, oxygen absorbers have a greater capacity than is listed on the package. This is intentional to allow for some exposure of the packet to air during your packaging process. None of this is necessary if you have a new, sealed bag of oxygen absorbers. However, if for any reason you want to check them, this is one way to get it done.
It's impossible to see how much life is left in an absorber by looking at it or feeling it. The only sure way is to actually see how much oxygen it will absorb. One way to do this is to tape the absorber to the bottom of a bottle. The larger the bottle the better. In my tests I used a gallon pickle bottle. Put the bottle upside down inside a pan of water being careful to set it straight down so no water enters the bottle. As the days pass and the absorber takes in oxygen, the water level will rise in the bottle. When it stops rising, use a magic marker and mark the water level, then take the bottle out of the water and fill it with fresh, new air. I did this by blowing 5 or 6 full breaths of air into the bottle. Then sit it back down into the water. When the water level stops rising again, mark the level again then fill it with new air and repeat the process until the absorber won't pull any more water up into the bottle.
In my tests it took 3 1/2 cycles for the D750cc absorber to get loaded using a 1 gallon bottle.
The next step is to see how much air was absorbed. Pour some water into the bottle, put on the lid, and turn the bottle over. Add/remove water until the level lines up even with the top line you made with the magic marker. Turn the bottle right side up, remove the lid, and pour it into a container. Now, repeat the process for each of the other water level marks and add this water to the first water in the container. After you have finished, measure the amount of the total water you poured into the container and this will give you a pretty good estimate of the cubic volume of oxygen your absorber absorbed.
Realize this is not 100% accurate if you take the atmospheric pressure and air temperature into account. As the barometer or room temperature fluctuate, they will make the water level go up or down in your bottle independent of how much oxygen has been absorbed. If you have a barometer, you may also wish to record the barometer reading each time you finish a cycle. You can correct for temperature by making sure the room temperature where you are doing your test is the same temperature each time you complete a cycle. Altitude will also have an effect on how much water gets into the jar. The higher the altitude the higher the water will rise for the same amount of oxygen being absorbed. This is because the air is thinner the higher you go in elevation. If you wish to remedy this, use the following table to correct your reading for sea level.
Your Multiply absorbed Altitude volume by... Sea Level 0.0000 1,000 ft. 0.9706 2,000 ft. 0.9411 3,000 ft. 0.9160 4,000 ft. 0.8866 5,000 ft. 0.8613 10,000 ft. 0.7395 15,000 ft. 0.6203
In one of my tests a 750cc absorber displaced 2425cc water at 2,000 feet. Corrected to sea level, that's 2,282cc water displacement. For that particular absorber, there was an actual capacity of 304% of it's advertised rating, more than I expected.
And thanks to LDS Welfare Services who gave us this idea in the first place.
Testing Whether an Oxygen Absorber is Used Up
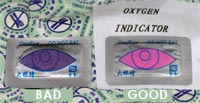
The first indication that an absorber may be used up is that it does not heat up when left out in air. Most oxygen absorbers will get warm to the touch within a few minutes and reach their maximum potential about 30 minutes after being left out. You can test a bag of absorbers by doing this, taking one of the absorbers out of the bag and leaving it on a table top, a cutting board, or even the carpet to see how quickly it warms up. If you hold it in your hand the whole time it may get warm from the heat of your skin so it's best to just let it set and see how it's doing every 5 minutes or so. Another great method that our absorber packs have is an oxygen indicator in each bag. Although this won't tell you if a specific absorber is effective or not, it can generally give some indication of how the bag as a whole is doing. The one drawback with these is that the dye that the manufacturer uses is not always consistent and I've had really light pink to dark pink ones and have done just fine with then - as long as they aren't dark purple you're good to proceed. The final method that was discussed in the section called "Packing Your Food With Oxygen Absorbers" is to let the mylar bags set for a couple of days at least after pushing out as much residual air as possible and after the final seal is created. If they are working you'll notice a definitely reduction in the air inside the bag and you'll get a more "vacuum-packed" look to the bag. In the end the goal is to remove the oxygen and not to get a perfectly vacuum-sealed container, but actually seeing some vacuum-seal to the bag is an excellent indicator and probably the best, assuming that you have used enough for the size of your container as well as the food type (eg. beans have more residual air in the spaces than flour).
Oxygen Absorbers and Long-Term Food Storage
Packing Your Food with Oxygen Absorbers
Why Use Mylar Bags in Food Storage
Using Food Storage Buckets and Containers
How Much Food Fits in a Container
Oxygen Absorbers Recommended Amounts
Properly Storing Then Opening Your Food
Checking the Capacity of Oxygen Absorbers