Packing Your Food With Oxygen Absorbers
Setting Up and Taking Inventory
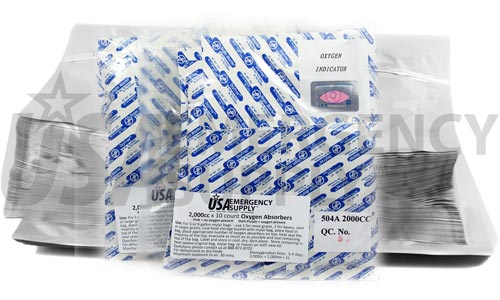
The first step in packing your food with oxygen absorbers is to get everything setup first so that once you open the oxygen absorber bag you are ready to seal things quick. After you open the bag the oxygen absorbers immediately start to absorb oxygen out of the air, so you need to work fast. If you are not planning on using all the absorbers the day you open them up, may I suggest you have a small mason jar set aside. This works best with a mason jar with a new lid since the gasket will be fresh and more likely to create an airtight seal. This jar shouldn't be any larger than what you need to hold the excess absorbers. It takes a large mouthed quart jar to hold 50 absorbers, at least with the type of absorbers we've used. The ones now are smaller and you should be able to fit a lot more inside a mason jar. If you really want to cut down on the extra air inside you can fill the empty space with white rice. Just like if you were canning produce, get a new lid and boil it in water to soften the rubber seal. Open the oxygen absorber bag and place the absorbers you don't plan on using during the day in it. Put the newly boiled lid on top of the jar and tightly screw down the ring. The absorbers will absorb the oxygen in the bottle then stop working. As this happens the lid on the bottle may pop down, reflecting the partial vacuum that is now inside the jar.
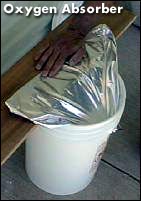
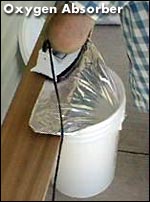
You could also iron the oxygen absorber bag shut with the unused oxygen absorbers inside. This is probably the better solution if you will be using all of them the next time you open it up. For the oxygen absorbers you plan on using during the next hour, have a zip lock bag set aside to put them in. After they are in the zip lock bag, push out all the air and zip it closed. This will work for you temporarily, but is not a good solution for long term storage of the oxygen absorbers. Use the original bag and iron the top shut for long-term storage. At this time you should also be ready to do your packing operation. Be sure all the food you want to preserve, the cans or buckets, mylar bags, heated clothes iron and board are on hand. For a board I recommend using the side edge of a 24" level to create a wide enough seam to keep the sealed bag airtight. As a test we purchased three different levels from Home Depot and had the best success with the inexpensive yellow plastic one instead of the more expensive ones. The same can be said for the clothes iron we used. We tested three purchased from Target from a $12 basic iron with steel bottom to a top-of-the-line $85 non-stick iron and again had the best results with the much less expensive basic iron. It was also easier to manage and in the case that it becomes damaged it is an economical replacement.
Sealing the Mylar Bags

Labeling and Storing
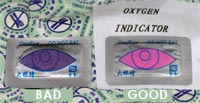
After the mylar bag has been sealed shut I like to leave the container aside for at least a couple of days to even a week to see if the oxygen absorbers have created a slight vacuum seal inside the bag. This is why it's good to get rid of as much of the air as possible before the final part of the mylar bag is sealed up. That way when you come back in a few days you'll see that the oxygen absorbers have been working. It can take several days to even several weeks for the oxygen absorbers to completely remove the oxygen depending on how tightly packed your food is. So if you are storing beans it will take much less time than if you are storing wheat where there not much room in between the individual granules. You'll get a partial vacuum well before this, but that doesn't necessarily mean that all of the oxygen has been removed - that can take quite a while. When in doubt though, if you don't see this slight reduction in the residual amount of air in the bag, then do it again. This time you'll just need to create a small slit in the bag, place new absorbers in and heat seal that part shut. It's not necessary to remove the old absorbers as they won't affect the long-term condition of your food. Be sure to inspect your seams as well in the process. Once the bag has a slight vacuum sealed look to it go ahead and place the lid on the top and label the bucket with the food type and date. Now it's ready to store long-term and is best kept in a cool, dry place at 70° or less.
Oxygen Absorbers and Long-Term Food Storage
Packing Your Food with Oxygen Absorbers
Why Use Mylar Bags in Food Storage
Using Food Storage Buckets and Containers
How Much Food Fits in a Container
Oxygen Absorbers Recommended Amounts
Properly Storing Then Opening Your Food
Checking the Capacity of Oxygen Absorbers